
Network Connector
The SearchBlox Network Connector allows you to index documents stored on Windows network file shares (SMB/CIFS). It runs as a separate crawler that connects to shared network folders, crawls the files, and indexes their content into a SearchBlox Custom Collection — making network drive content fully searchable.
Configuring SearchBlox
Create Custom Collection
Navigate to: Collections → Create New Collection
Select Custom Collection type Custom Collection.


Installing the Network Crawler
Note:Contact [email protected] to get the download link for SearchBlox-network-crawler.
For Linux Systems:
# 1. Create installation directory
sudo mkdir -p /opt/searchblox-network

# 2. Download the latest network crawler package

# 3. Extract the package
sudo unzip /tmp/searchblox-network-crawler-latest.zip -d /opt/searchblox-network

# 4. Set permissions
sudo chown -R searchblox:searchblox /opt/searchblox-network
sudo chmod -R 755 /opt/searchblox-network/bin
For Windows Systems:
Create folder C:\\searchblox-network
Download the Windows package
Extract the ZIP contents to C:\\searchblox-network
Configuring SMB
The extracted folder will contain a folder named /conf, which contains all the configurations needed for the crawler.
Locating the Config File
Linux: /opt/searchblox-network/conf/config.yml
Windows: C:\searchblox-network\conf\config.yml
- Config.yml
This file is used to connect SearchBlox with the network crawler. Open it in any text editor to make changes.
| Field | Description |
|---|---|
apikey | Your SearchBlox API Key (found under the Admin tab). |
colname | The name of the custom collection you created. |
colid | The ID of your collection (visible in the Collections tab). |
url | The URL of your SearchBlox instance. |
sbpkey | Your SearchBlox SB-PKEY (found under Users tab; create an admin user if needed). |
apikey: DD7B0E5E6BB786F10D70A86399806591
colname: custom
colid: 2
url: https://localhost:8443/
sbpkey: MNiwiA0TNlIBG0jZpWVPNuszaT/jT39G03kpF01gUpjGQK8+ZSKtQMNVqKxxke/wEthSWw==
- searchblox.yml
This is the OpenSearch configuration file used by the SearchBlox network crawler; open it in your preferred editor to make any changes.
| Setting | Description |
|---|---|
searchblox.elasticsearch.url | The full OpenSearch URL with port. Update it if you are using a specific IP or domain. |
searchblox.elasticsearch.host | The hostname that OpenSearch uses.. |
searchblox.elasticsearch.port | The port number used by OpenSearch. |
searchblox.elasticsearch.basic.username | The username for logging into OpenSearch. |
searchblox.elasticsearch.basic.password | The password for logging into OpenSearch. |
es.home | Path to OpenSearch. Example: Linux → /opt/searchblox/opensearch; change based on your OS. |
searchblox.elasticsearch.host: localhost
searchblox.elasticsearch.port: 9200
searchblox.elasticsearch.basic.username: admin
searchblox.elasticsearch.basic.password: xxxxxxx
es.home: C:\SearchBloxServer\opensearch
- windowsshare.yml
Enter the domain server details, authentication domain, username, password, folder path, disallow path, allowed formats, and recrawl interval in:
C:/searchblox-network/conf/windowsshare.yml.
You can also add details for multiple servers or multiple paths from the same server in this file.
You can check the sample content inside the file for reference.
//The recrawl interval in days.
recrawl : 1
servers:
//The IP or domain of the Server.
  - server: 89.107.56.109
//The authentication domain if available it can be optional
    authentication-domain:
//The Administrator Username
    username: administrator
//The Administrator password
    password: xxxxxxxx
//The Folder path where the data need to be indexed.
    shared-folder-path: [/test/jason/pencil/]
//The disallow path inside the path that needed to be indexer.
    disallow-path: [/admin/,/js/]
//The file formats that need to be allowed for indexing
    allowed-format: [ txt,doc,docx,xls,xlsx,xltm,ppt,pptx,html,htm,pdf,odt,ods,rtf,vsd,xlsm,mpp,pps,one,potx,pub,pptm,odp,dotx,csv,docm,pot ]
//Details of another server or another AD path to crawl
  - server: 89.107.56.109
    authentication-domain:
    username: administrator
    password: xxxxxxxxxx
    shared-folder-path: [/test/jason/newone/]
    disallow-path: [/admin/,/js/]
    allowed-format: [ txt,doc,docx,xls,xlsx,xltm,ppt,pptx,html,htm,pdf,odt,ods,rtf,vsd,xlsm,mpp,pps,one,potx,pub,pptm,odp,dotx,csv,docm,pot ]
Starting the Crawler
To start the crawler:
** On Linux, run start.sh.
On Windows, run start.bat.
The crawler will run in the background, and you can view logs in the logs folder.
Note
Single Instance Limitation:
Only one network crawler can run at a time. To crawl different paths or servers, update the configurations in Windowsshare.yml.Re-running for a New Collection:
Before re-running the crawler for a different collection, delete the sb_network index using an Elasticsearch-compatible tool.Stopping the Crawler:
The network connector must be stopped manually when no longer needed.Plain Password Requirement:
If your server restricts plain-text passwords, enable them by adding the following parameter to start.bat:-Djcifs.smb.client.disablePlainTextPasswords=false
Searching Securely Using SearchBlox
To enable Secure Search using Active Directory:
- Go to Search → Security Settings.
Turn on Enable Secured Search.
Fill in the needed LDAP settings.
Test the connection to make sure everything works.
Once enabled, Secure Search will function based on your Active Directory configuration.
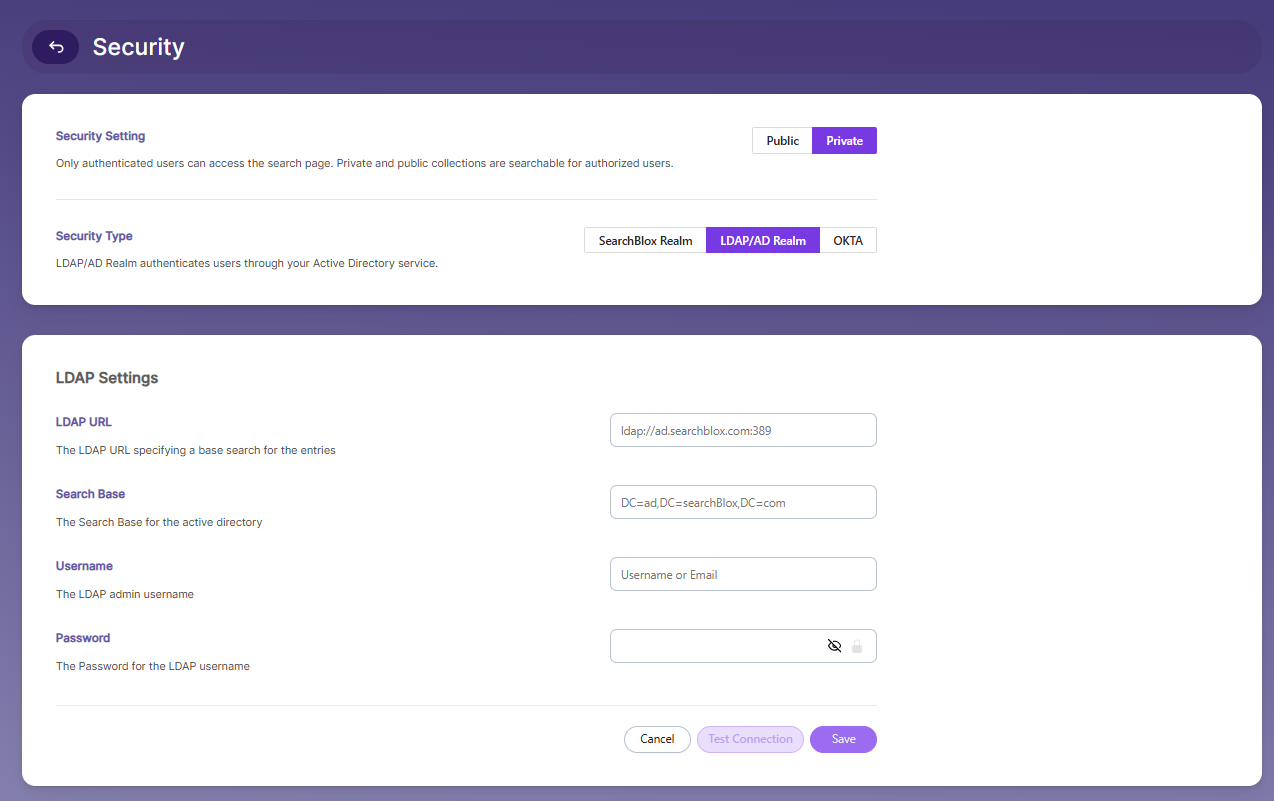
- Enter your Active Directory details.
| Lable | Description |
|---|---|
| LDAP URL | The URL used to connect to your LDAP/AD server. |
| Search Base | The main directory path where the search begins. |
| Username | The admin username used to log in. |
| Password | The password for the admin username. |
| Filter-Type | Choose the filter type (default or document). |
| Enable document filter | Turn on this option to show results based on the user. |
- After setting up security groups, log in using your AD credentials:
https://localhost:8443/search
Admin Access to File Share
To index files from an SMB share that requires authentication:
- Run SearchBlox Service with Admin Access
Make sure the SearchBlox service is running using an Admin account or any account that has permission to read the shared files.
Enter the login details when asked. - Run the Network Crawler with Admin Rights
Start the network crawler using an Admin account (or an account with enough permissions) so it can crawl and index the files properly.

How to increase memory in Network Connector
For Windows
- Navigate to:
<network_crawler_installationPath>/start.bat - Locate the line:
rem set JAVA_OPTS=%JAVA_OPTS% -Xms1G -Xmx1G - Remove rem to uncomment and adjust memory (e.g., 2G or 3G):
set JAVA_OPTS=%JAVA_OPTS% -Xms2G -Xmx2G
For Linux
- Navigate to:
<network_crawler_installationPath>/start.sh - Uncomment and modify the line:
JAVA_OPTS="$JAVA_OPTS -Xms2G -Xmx2G"
Note: Adjust values (2G, 3G, etc.) based on available system resources.
Delete sb_network to rerun the crawler in another collection.
Prerequisite Steps:
- Delete the Existing Index
Before running the crawler for a new collection, delete the sb_network index using any Elasticsearch-compatible tool. - Check if the Index Exists
You can confirm whether the index is present by opening the URL and checking if sb_network appears in the response. -
https://localhost:9200/_cat/indices

Postman can be used to access Opensearch.
Start Postman and create a request to delete an index using the DELETE method as shown here:

Check for the "acknowledged": "true" message to confirm the deletion.
Then check https://localhost:9200/_cat/indices; the sb_network index should no longer appear in the list.
After that, run the crawler again once you have updated your config.yml.
Best Practices
- Always verify your
config.ymlsettings. Incorrect API key, collection name, or SB-PKEY values are the most common causes of indexing failures. - Use the
disallow-pathfield inwindowsshare.ymlto exclude system folders, admin directories, and script folders from indexing. - Increase the crawler memory allocation if you are indexing large volumes of files. Refer to the memory increase steps above.
- For secure search using Active Directory, test the LDAP connection before enabling secured search to avoid locking out users.
Updated about 1 month ago