Cluster Setup
A SearchBlox Cluster setup is designed to provide high availability, scalability, and fault tolerance for enterprise search operations. The cluster includes an Index Server and 2 Search Servers, each serving specific roles to ensure continuous data ingestion and efficient query distribution.
Components of the SearchBlox Cluster:
Index Server:
- Role: Handles continuous crawling and ingestion of data from various sources.
- Function: Synchronizes search indices across multiple Search Servers.
- Benefit: Ensures that the search index is always up-to-date with the latest data.
Search Servers (Search Server 1 and Search Server 2):
- Role: Distribute search queries and provide search results.
- Function: Serve search requests from users, ensuring fast and reliable search performance.
- Benefit: Load balancing between the two Search Servers ensures high availability and fail-safe operation.
SearchBlox Multi Node Cluster
Setting up a Multi-Node Cluster in SearchBlox enhances the scalability, availability, and performance of your enterprise search solution. Here’s a step-by-step guide to configure the cluster directly from the SearchBlox Admin Console.
Recommended Cluster Configuration:
1 Index Server - Handles continuous crawling and indexing.
2 Search Servers - Distribute search queries and provide search results.
Prerequisites for Cluster Setup
-
Install SearchBlox:
Install SearchBlox on three different physical or virtual servers. -
Network Connectivity:
Ensure that the three servers can communicate with each other over the network. You should be able to ping each server using their IP addresses. -
Port Configuration:
Allow traffic on ports 9200 and 9300 among the three cluster servers. Ensure there are no firewall restrictions blocking these ports. -
Delete Existing Collections:
Remove all existing collections from all three servers before configuring the cluster setup. -
Upload Server Licenses:
Upload the appropriate licenses for all three servers. Save the IP addresses displayed on the license page for each server.
Configure Cluster Setup through Index Server Admin Console
- Access the Index Server Admin Console:
Log in to the Admin Console of the Index Server. - Navigate to Cluster Configuration:
Go to Dashboard -> Administration -> Cluster. - Select Multi-Node Cluster:
Choose the Multi-Node option as shown in the screenshot.
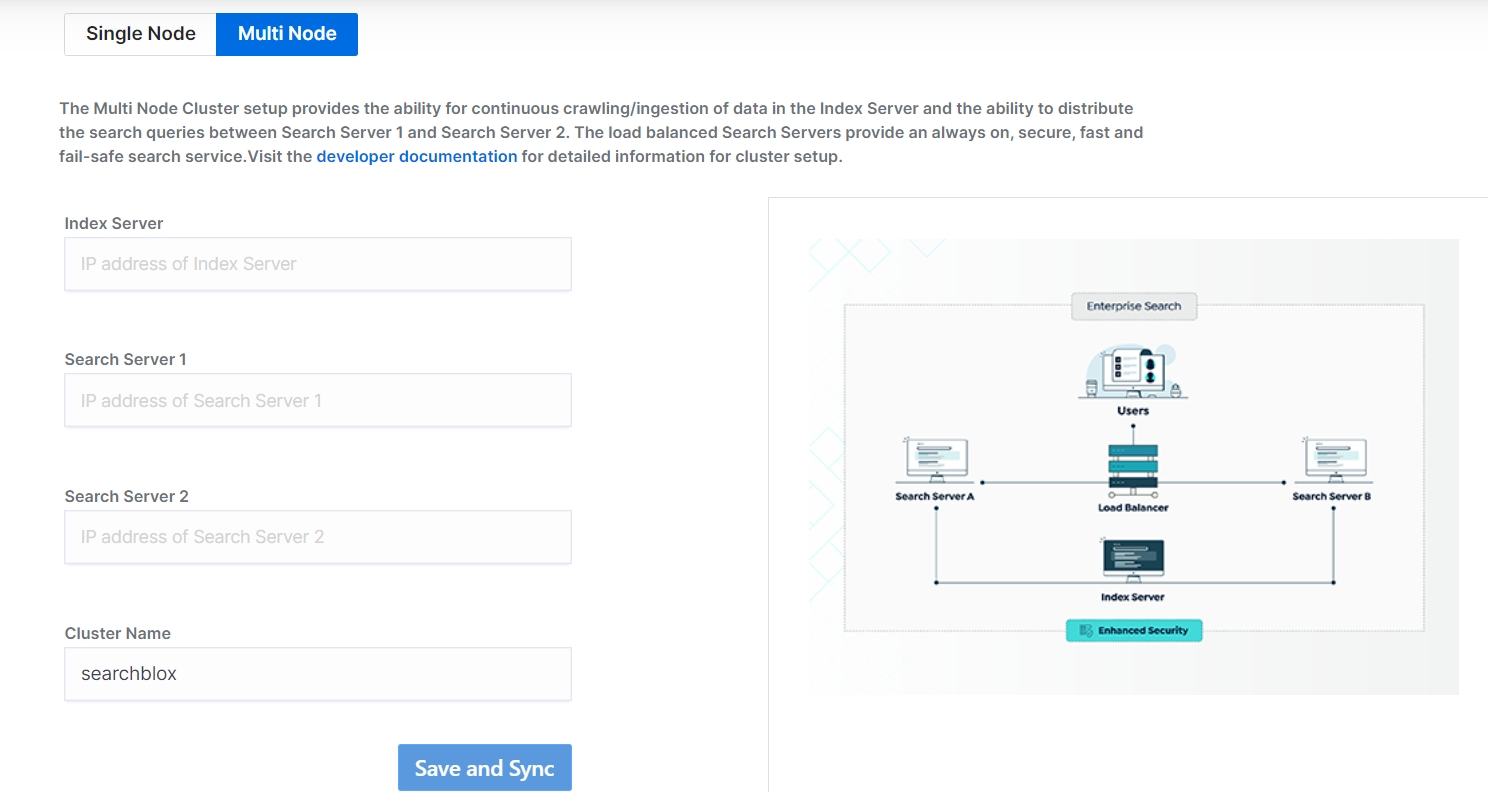
- Enter the IP addresses for Index and Search Servers to join the cluster through Index Server.
- Indexing Server:
Action: Enter the IP address of the current server from which you are configuring the cluster.
Purpose: This server will act as the Index Server, responsible for continuous crawling and indexing. - Search Servers:
Action: Enter the IP addresses of Search Server 1 and Search Server 2.
Purpose: These servers will act as Search Servers, handling search queries and providing search results. - Cluster Name (Optional):
Action: If desired, provide a unique cluster name for your SearchBlox cluster setup.
Purpose: Helps in identifying the cluster if you have multiple clusters.
- Indexing Server:
Example Configuration:
Server Type IP Address
Index Server: 192.168.1.101
Search Server 1: 192.168.1.102
Search Server 2: 192.168.1.103
Cluster Name: MySearchBloxCluster
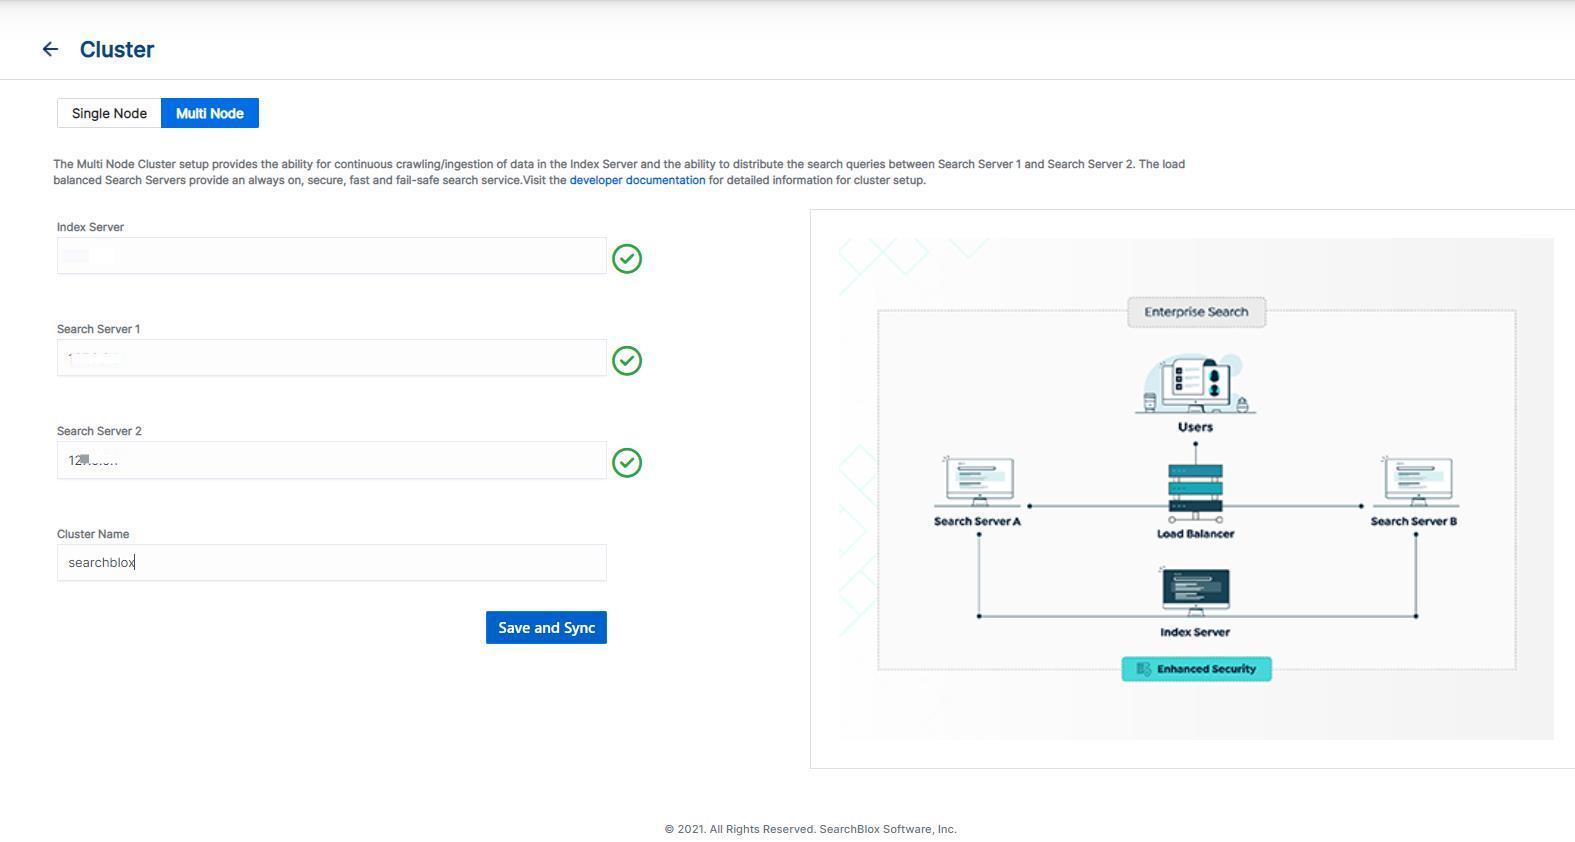
-
Save Configuration:
After entering the details, save the configuration. The Admin Console will log out automatically after a few seconds. -
Re-login and Create a New Collection:
Re-login to the Index Server Admin Console.
Create a new collection and start indexing. The new collection will be available on the two Search Servers within a few minutes if the setup is successful.
Accessing Search Servers:
After a successful cluster setup, the Admin Console of the Search Servers will not be accessible.
To access the search functionality, use the following URL
https\://<Search-Server-IP-or-DNS>/search/index.html
Troubleshooting Cluster Setup: If the new collection is not shown on the search servers
- Check Cluster Status:
Run the following command on all servers to check the cluster status:
curl -XGET 'https\://<IP>:9200/\_cluster/health?pretty=true'
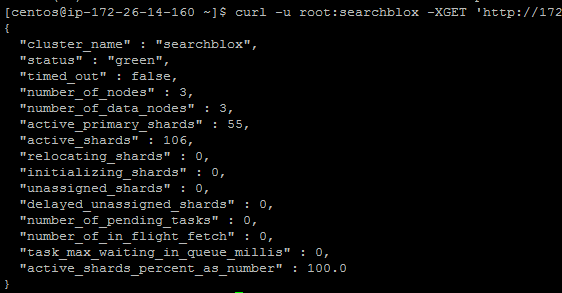
Alternatively, access the URL in a browser:
https\://<IP>:9200/\_cluster/health?pretty=true
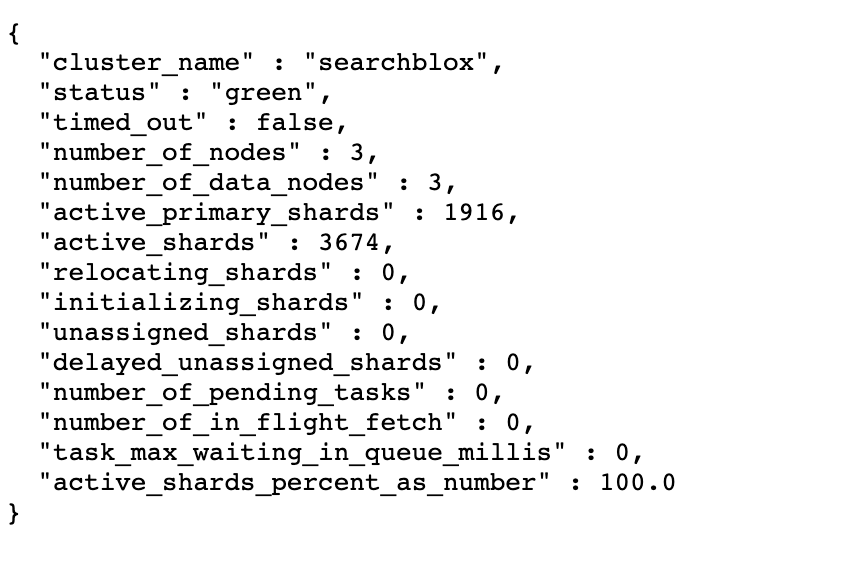
- Verify Cluster Health:
Status: Should be green or yellow.
Number of Nodes: Should be 3 for a three-server cluster setup.
If the number_of_nodes is 3 and the cluster health is green or yellow, then the setup is successful. - Create More Collections:
If the cluster status is correct, create additional collections on the Index Server. These collections will automatically be available on the Search Servers for search access.
Indexing and Searching in Cluster Setup
In a SearchBlox Multi-Node Cluster, the roles of the Index Server and Search Servers are clearly defined to ensure high availability, fault tolerance, and efficient search operations.
- Indexing:
- Allowed Only on the Index Server:
Indexing and Admin Console configuration (e.g., creating collections, configuring connectors, etc.) can only be performed on the Index Server. - Data Replication:
Once data is indexed on the Index Server, it is automatically replicated to the Search Servers for search availability.
- Allowed Only on the Index Server:
- Searching:
- Search from Both Index and Search Servers:
Search queries can be executed from both the Index Server and the Search Servers. - Load Balancing:
Search queries are distributed between the Search Servers for optimal performance.
- Search from Both Index and Search Servers:
- Fault Tolerance:
- If the Index Server Goes Down:
Searching: Search queries can still be served by the Search Servers until the Index Server recovers.
Indexing: Indexing operations will be paused until the Index Server is back online. - If a Search Server Goes Down:
Searching: Search queries can still be served by the Index Server and the remaining Search Server.
Indexing: Indexing operations continue on the Index Server.
Recovery: When the failed Search Server comes back online, it will automatically sync with the other servers to replicate the indexed data.
Summary of Indexing and Searching in Cluster Setup - If the Index Server Goes Down:
| Scenario | Indexing | Searching | Notes |
|---|---|---|---|
| Normal Operation | Only on Index Server | From Index Server and Search Servers | Data is replicated to Search Servers. |
| Index Server Down | Paused | From Search Servers | Search continues until Index Server recovers. |
| Search Server Down | Continues on Index Server | From Index Server and remaining Search Server | Failed Search Server syncs data when it recovers |
Manual Configuration of Cluster Setup
To manually configure a SearchBlox Multi-Node Cluster, follow these steps:
- Install and Start SearchBlox Service:
Install SearchBlox on all three servers (1 Index Server and 2 Search Servers). Start the SearchBlox service on each server. Import the license on each server. Ensure the License Screen IP matches the IP mapped in the license.xml file. - Check Port Connectivity:
Verify that the required ports (9200 and 9300) are open and accessible between the servers.
Use the telnet command to check connectivity:
telnet <IP or hostname> 9200
telnet <IP or hostname> 9300
If telnet is not available, use the curl command:
curl -k -u <username>:<password> https://<IP of cluster node>:9200
curl -k -u <username>:<password> https://<IP of cluster node>:9300
Ensure all SearchBlox Ports are allowed for internal network access.
- Delete Default Collections:
Delete the default HTTPCollection from the Manage Collections screen on all three servers.
Stop the SearchBlox service on all servers. Ensure no other SearchBlox processes are running in the background. - Configure opensearch.yml:
Add the following cluster configuration lines at the end of the opensearch.yml file on each server. Replace with the appropriate IP addresses:
cluster.name: <ClusterName>
node.name: <NodeName>
network.host: <IP>
discovery.seed_hosts: ["<IP1>", "<IP2>", "<IP3>"]
cluster.initial_master_nodes: ["<IP1>", "<IP2>", "<IP3>"]
Example Configuration:
cluster.name: MySearchBloxCluster
node.name: IndexServer
network.host: 192.168.1.101
discovery.seed_hosts: ["192.168.1.101", "192.168.1.102", "192.168.1.103"]
cluster.initial_master_nodes: ["192.168.1.101", "192.168.1.102", "192.168.1.103"]
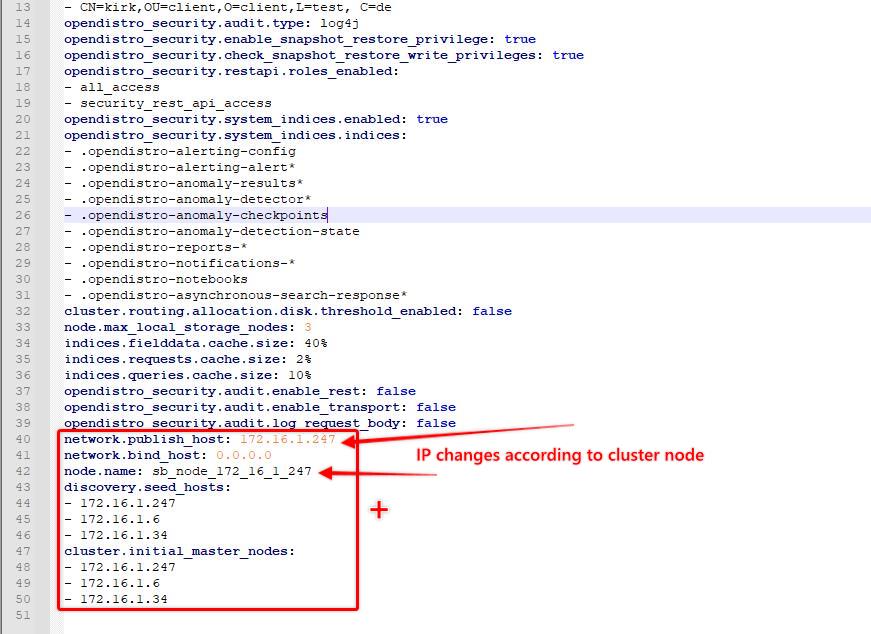
-
'node.name' to be provided with the licensed IP address in the same format as shown in the reference.
-
'discovery.seed_hosts' will have all 3 cluster server IP addresses.
-
'cluster.initial_cluster_manager_nodes' will have all 3 cluster servers 'node.name' values.
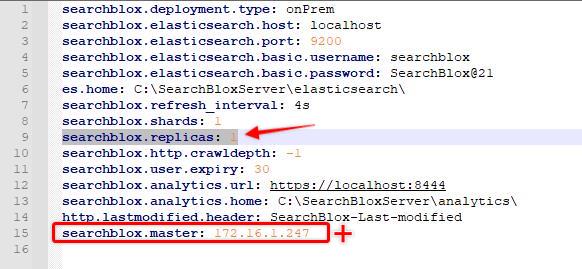
- Add the following line at the end of the searchblox.yml file in all 3 servers
searchblox.master: 172.16.1.247
- Here 'searchblox.master' IP represents Index server IP Address in all 3 searchblox.yml files.
- Finally set the replicas count to 1 with the existing line in all 3 searchblox.yml file.
searchblox.replicas: 1
- Here 'searchblox.replicas' value represents the number of data copies that the cluster maintains over cluster servers.
- Delete the nodes folder under <SEARCHBLOX_INSTALLATION_DIRECTORY>/opensearch/data/ path and stop SearchBlox. And also delete the logs folder files under <SEARCHBLOX_INSTALLATION_DIRECTORY>/opensearch/logs/
This is the step you need to follow when you face 503 error while setting up the cluster and starting the SearchBlox service.
- Start Index Server followed by Search Server 1 and Search Server 2.
Troubleshooting Step: When you dont find the Index server to start, try starting Search Server 1 and Search Server 2. In this process Master node will get discovered. And you can stop the SearchBlox Server which are failed to start from the Cluster. Delete the nodes folder from .../opensearch/data/ path. And Start SearchBlox. You should be able to start all 3 cluster SearchBlox Servers. Now create the collection through Index server and access Search from Search 1 and Search 2 servers to make sure data replication works.
Upgrade Cluster
A clean installation to cluster similar to standalone servers is recommended. Cluster setup is a one time configuration. If the cluster setup has to be reconfigured using the same servers, Admin console features 'Multi Node' to 'Single Node' selection will not work.
Best Practices for Cluster Setup
- Load balancer needs to be setup to distribute the load between search servers.
- Ensure searches are done only on the Search Servers for best performance.
- Ensure that Index and Search servers are able to connect with each other on the same network.
- Port 9200 and 9300 should be open across all the three servers. Traffic must be allowed on ports 9200 and 9300 among these 3 servers.
- Elasticsearch URLs should be accessible across all three servers
- Please restart all servers after adding the cluster nodes and/or changing the cluster name.
- After configuring cluster setup, we recommend not to choose Single Node setup as it requires additional manual steps to remove cluster setup.
Updated 10 months ago
