
SSO
Let administrators log in to SearchBlox using their existing company credentials — no separate password needed.
Single Sign-On (SSO) is an authentication method that allows users to access multiple applications using a single set of credentials. In SearchBlox, SSO can be enabled or disabled for the Admin Console, giving administrators flexibility and enhanced security.
Key Features of SSO in SearchBlox
Simplified Access:
Users can log in to the SearchBlox Admin Console using their existing SSO credentials from providers such as Google or Microsoft, eliminating the need to remember multiple usernames and passwords.
Enhanced Security:
SSO uses trusted identity providers, reducing the risk of weak or reused passwords. Centralized authentication also makes it easier to enforce security policies such as multi-factor authentication.
Flexibility:
SSO can be enabled or disabled based on organizational needs and works with popular identity providers that support standard protocols such as SAML or OAuth.
Seamless Integration:
SSO integrates with existing enterprise identity management systems to ensure a smooth and consistent user experience.

⚠️ Before You Begin
- You must have an Identity Provider (IdP) already configured, such as Azure AD, Okta, or Google Workspace.
- Your Identity Provider must support SAML 2.0.
- You will need the IdP Metadata XML file from your Identity Provider before starting the configuration.
- Only Super Admin and Admin users can enable or configure SSO.
⚠️Disabling SSO permanently removes all existing SAML configuration settings. If you re-enable SSO later, you must configure it again from scratch.
Enable SSO Authentication
-
Access Admin Console:
Log in to the SearchBlox Admin Console using administrator privileges. -
Navigate to SSO Settings:
Go to the Security or Authentication section in the Admin Console. -
Enable SSO:
Toggle the SSO option to enable it. To activate SSO authentication in SearchBlox, SAML configuration is required. The following table provides the fields and their descriptions for setting up SAML-based SSO.
| Field | Description |
|---|---|
| SearchBlox URL | This is the base URL used to generate the SearchBlox Service Provider(SP) Metadata file for SSO. URL Format Example: <Host/Domain Name>: port, <IP Address>: port. |
| IdP Metadata XML File | Upload the Identity Provider (IdP) Metadata XML File for SAML SSO. This file contains the IdP's configuration details, such as endpoints and certificates. |
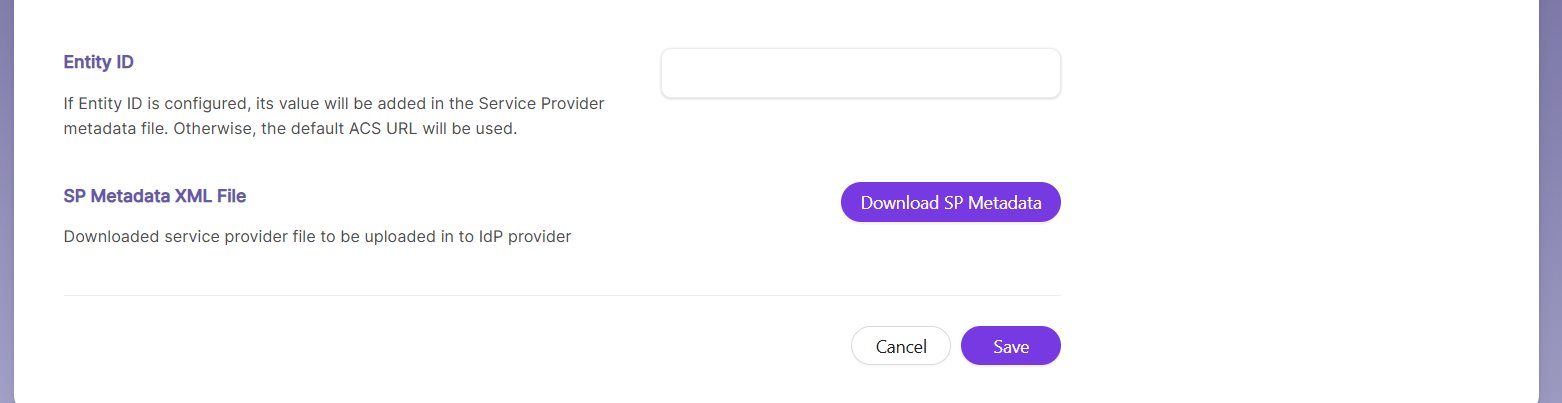
| SP Metadata XML File | Download the SP metadata XML file. This is a one-time UI option available immediately after uploading the IdP metadata XML file and saving the SAML configuration. You can also view the SP metadata file using: https://localhost:8443/meta-saml |
| Entity ID | If an EntityID is configured, its value will be added to the Service Provider metadata file. If not, the default ACS URL will be used.https://<ip/domain>/saml/callback?client_name=SAML2Client |

Notes:
- **Upload IdP Metadata XML File:
Log in to the SearchBlox Admin Console, navigate to the SSO Settings or Authentication section, and upload the IdP Metadata XML file provided by your Identity Provider.- Restart SearchBlox:
Restart the SearchBlox service after uploading the IdP Metadata XML file to apply the changes and generate the SP Metadata file.- Locate the SP Metadata File:
After SearchBlox restarts, locate the sp-metadata.xml file in the . This file contains the Service Provider configuration details needed by your Identity Provider.- Upload SP Metadata File to IdP:
Download the sp-metadata.xml file and upload it to your Identity Provider’s configuration portal to complete the SSO setup.- Re-login to SearchBlox:
After uploading the SP metadata file to your IdP, log in to the SearchBlox Admin Console using your SSO credentials.- Use a Private Browser Window:
Use a private or incognito browser window when logging in to avoid caching issues and ensure proper SSO authentication.
Example Configuration
SearchBlox URL: https://searchblox.example.com:8443
IdP Metadata XML File: Upload the file provided by your Identity Provider (e.g., Azure AD).
SP Metadata XML File: Download and share this file with your Identity Provider.
Entity ID: https://searchblox.example.com/saml/callback?client_name=SAML2Client
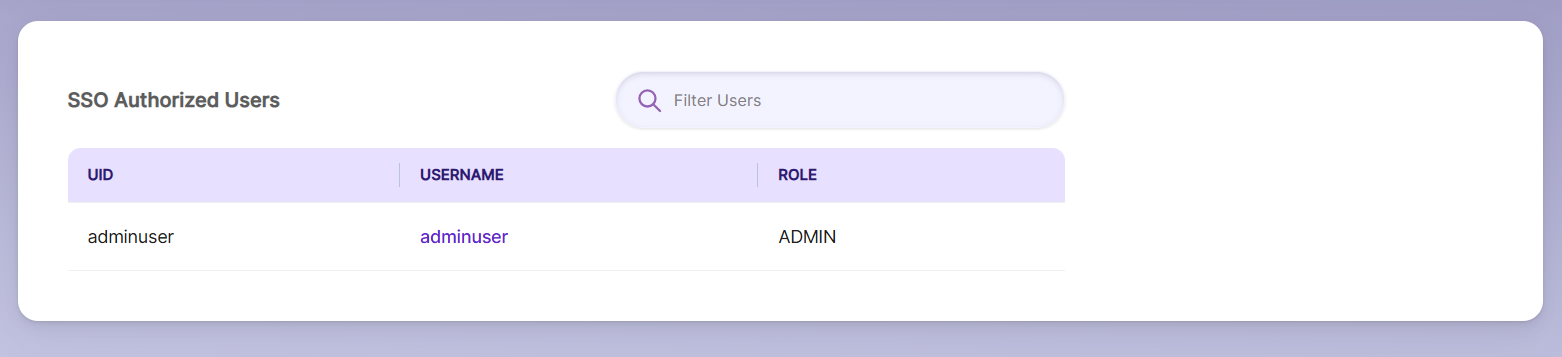
SSO Authorized Users
To enable SSO authentication in SearchBlox, users must be added to both the Identity Provider (IdP) and the SearchBlox Realm. Only users added to the SearchBlox Realm are recognized as SSO-authorized users and can access the system using their SSO credentials.
Steps to Add and Manage SSO Authorized Users
-
Add Users to Identity Provider (IdP):
Ensure users are added and properly configured in your Identity Provider (e.g., Azure AD, Okta, Google). The IdP handles authentication and passes validated user credentials to SearchBlox. -
Add Users to SearchBlox Realm:
Log in to the SearchBlox Admin Console with administrator privileges. Navigate to the SSO Authorized Users section. Click Add User to include new users in the SearchBlox Realm and provide the required details:
Username: Must match the username configured in the IdP.
Email: Enter the user’s email address.
Roles: Assign appropriate roles (e.g., Admin, User) to define access permissions. -
Filter Users:
Use the filter option in the top-right corner of the SSO Authorized Users page to quickly search for users based on username, email, or roles. -
Manage Users:
Edit User Details: Update information such as email or assigned roles.
Delete Users: Remove users who no longer need access to SearchBlox.
Key Points to Remember
- *User Synchronization: Users must exist in both the Identity Provider (IdP) and the SearchBlox Realm to authenticate through SSO.
- Role Assignment: Assign appropriate roles to users in the SearchBlox Realm to define their access levels.
- Filtering: Use the filter option to quickly locate and manage users in large lists.
CAUTION
When you disable SSO, existing SAML configuration will be cleared. If you want to re-enable SSO, all the settings have to be configured again.
Updated about 1 month ago