
SearchAI PrivateLLM Installation
For Windows
This guide walks you through the complete process of setting up SearchAI PrivateLLM on a Windows server where SearchBlox is already installed.
Prerequisites:
SearchBlox has been installed following the instructions in Installing on Windows.
Steps to Install SearchAI PrivateLLM
-
After the installation of SearchBlox from Installing on Windows section.
-
Navigate to Ollama Directory:
Open Windows Explorer and navigate toC:\SearchBloxServer\ollama. -
Download and Extract Ranker Model:
Download the ranker.zip file from the following link: ranker.zip
Extract the contents of the zip file. -
Place Ranker Model:
Navigate to<SearchBlox-installation>/webapps/ROOT/models.
Copy the extracted ranker folder into this directory.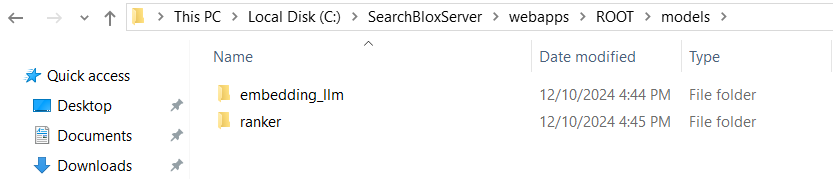
-
Download Ollama Models:
Download the models.zip file for Ollama from:
SearchAI PrivateLLM models -
Extract and Replace Models Folder:
Extract the downloaded models folder.
Navigate toC:\\SearchBloxServer\ollama\models.
Replace the existing models folder with the extracted one. -
Run Ollama Setup:
Navigate toC:\SearchBloxServer\ollamaand runollamaSetup.exe. -
Set Environment Variables:
SetOLLAMA_MODELSand environment path variable as shown in the following:- Follow step 1 and 2 from Prerequisites
- Create a new User Variable
OLLAMA_MODELSwith valueC:\SearchBloxServer\ollama\models - Click on
OK.
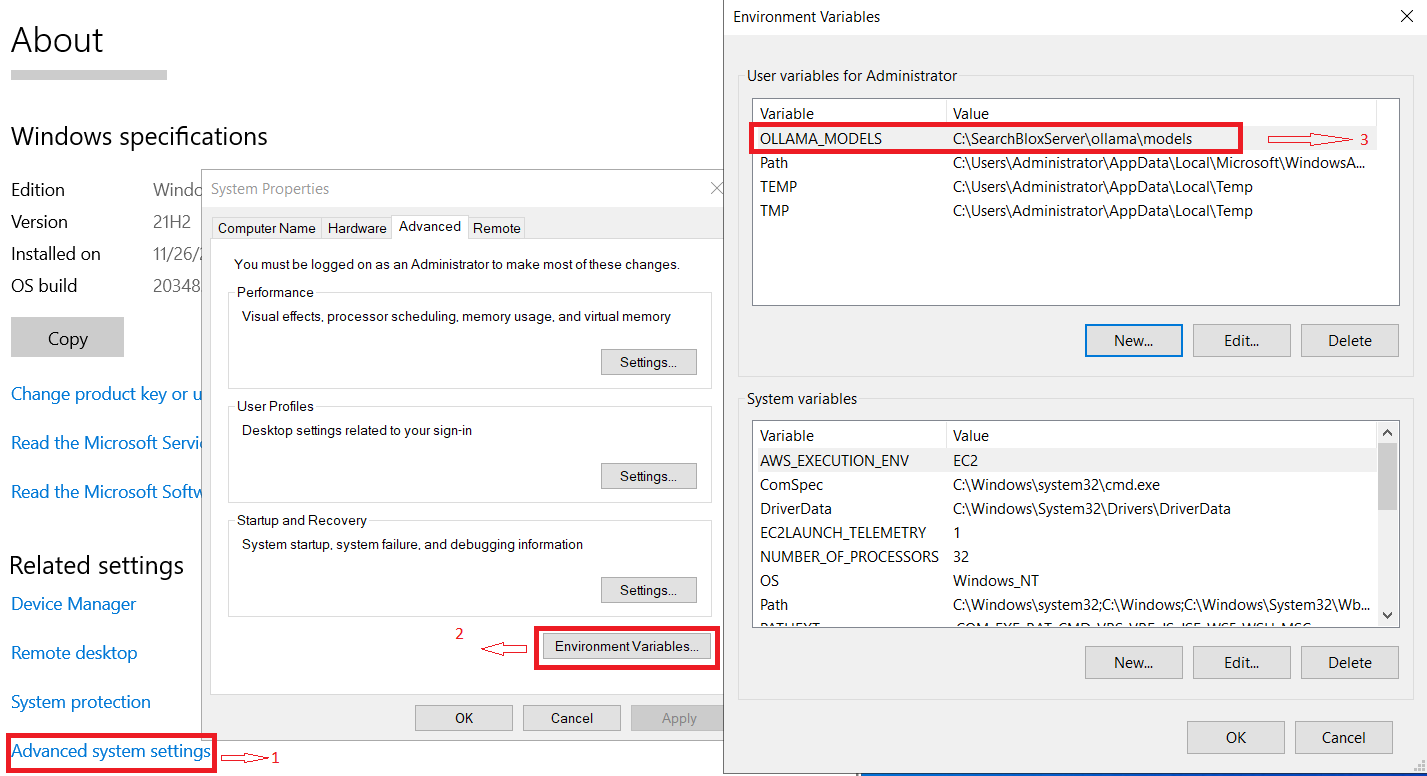
- Restart the Windows Server.
- Verify Installation:
After the server restarts, open a web browser and navigate tohttp://localhost:<port>, where is the Ollama port (default is 11434). This will confirm that SearchAI PrivateLLM is running.
For CentOS, RHEL/Ubuntu/Amazon Linux 2
Steps to Install and Run SearchAI PrivateLLM
- After SearchBlox installation from Installation section, Download the Models folder from the following link.
SearchAI PrivateLLM Models - After downloading , extract the
modelsfolder. - Navigate to
/opt/searchblox/ollama/modelsand replace themodelsfolder with the downloaded one. - To create a service file, navigate to
/etc/systemd/system/and create aollama.servicefile by running the following command:
vi /etc/systemd/system/ollama.service - Update the
/etc/systemd/system/ollama.servicefile with following script:[Unit] Description=Ollama Service After=network-online.target [Service] WorkingDirectory=/opt/searchblox/ollama/bin ExecStart=/opt/searchblox/ollama/bin/ollama serve User=root Group=root Restart=always RestartSec=3 Environment="OLLAMA_MODELS=/opt/searchblox/ollama/models/" [Install] WantedBy=default.target - Provide execute permission for
ollama.servicefile by executing the following command:
chmod 755 /etc/systemd/system/ollama.service
chmod 755 /opt/searchblox/ollama/bin/ollama - Enable the
ollama.serviceby running the following command:
systemctl demon-reload - Start ollama Service by running the following command:
systemctl start ollama - To check the models run the following command:
./opt/searchblox/ollama/bin/ollama list - To stop Ollama Service run the following command:
systemctl stop ollama - To auto start Ollama Service when system reboots run the following command:
systemctl enable ollama
Updated about 2 months ago