
SearchAI Agents
Overview
Agents is a SearchAI feature that enables intelligent query execution using AI language models over your indexed search collections. Primary applications include automated question answering, complex multi-step reasoning, scheduled content analysis, and multi-agent orchestration.

Key Features
- Create and manage LLM and Workflow agents
- Bind agents to one or more search collections.
- Invoke agents interactively through a chat interface
- Orchestrate multiple agents simultaneously with aggregated results
- Schedule automated agent runs using cron-based expressions
- Configure webhook and email notifications for scheduled executions
Types of Agents
LLM: Answers queries by retrieving relevant content from search collections and generating a response using the configured language model.
Workflow: Handles complex queries by reasoning step by step and calling tools as needed to arrive at a final answer.
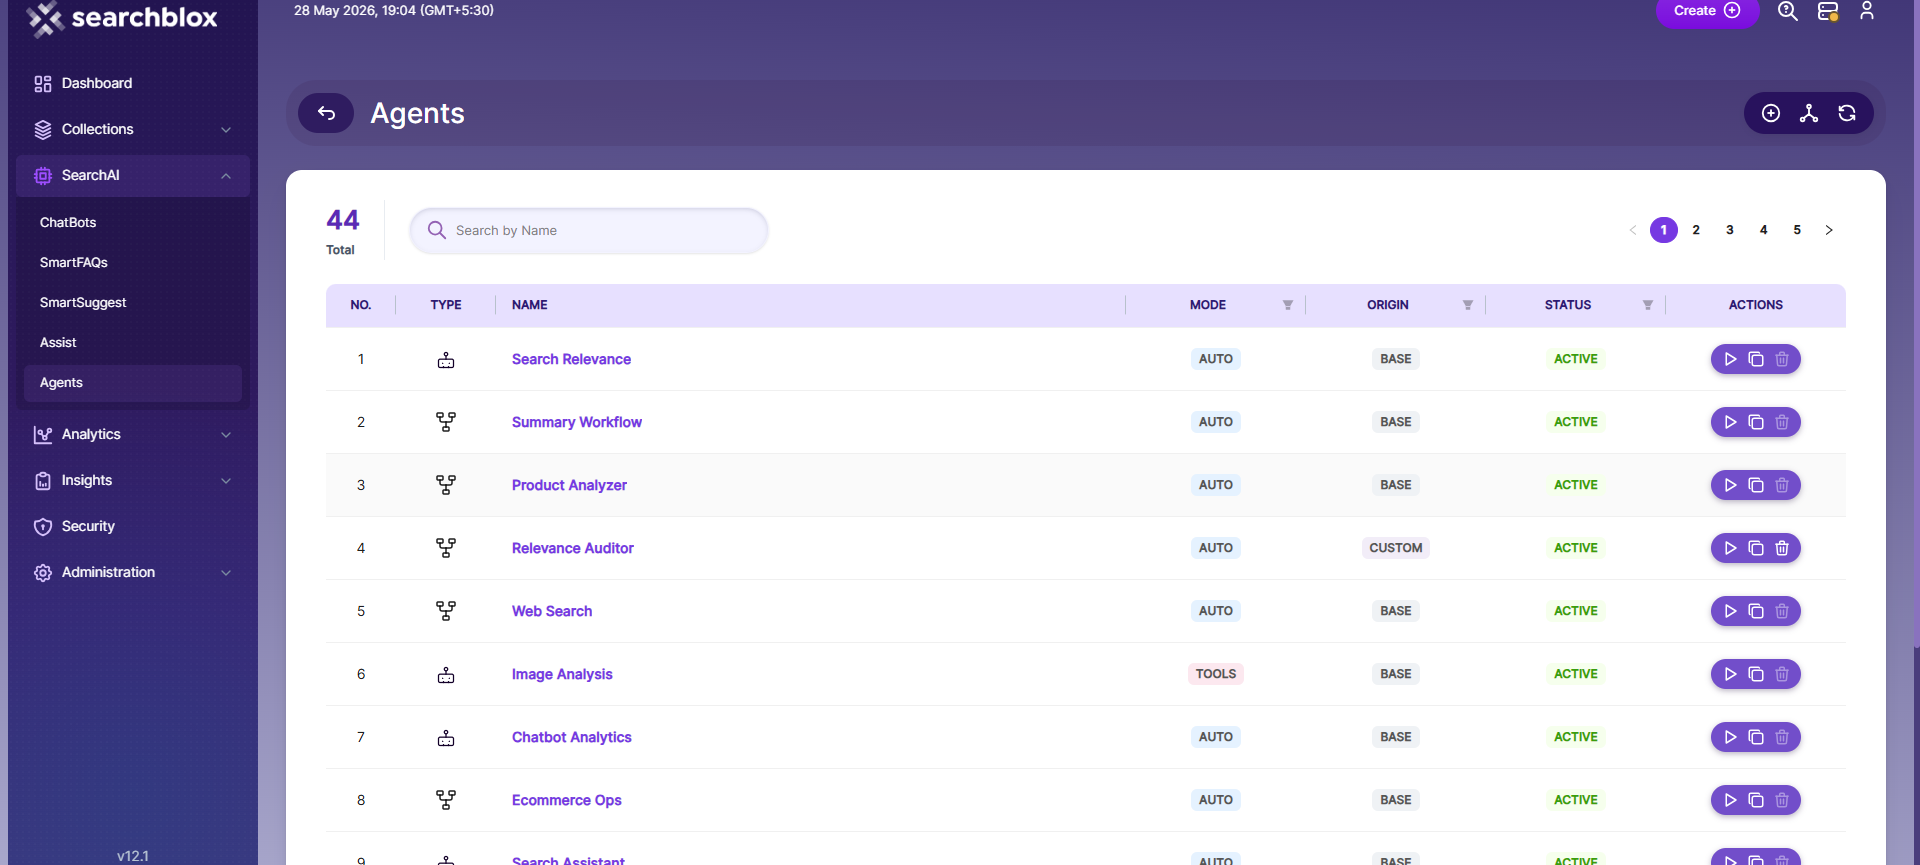
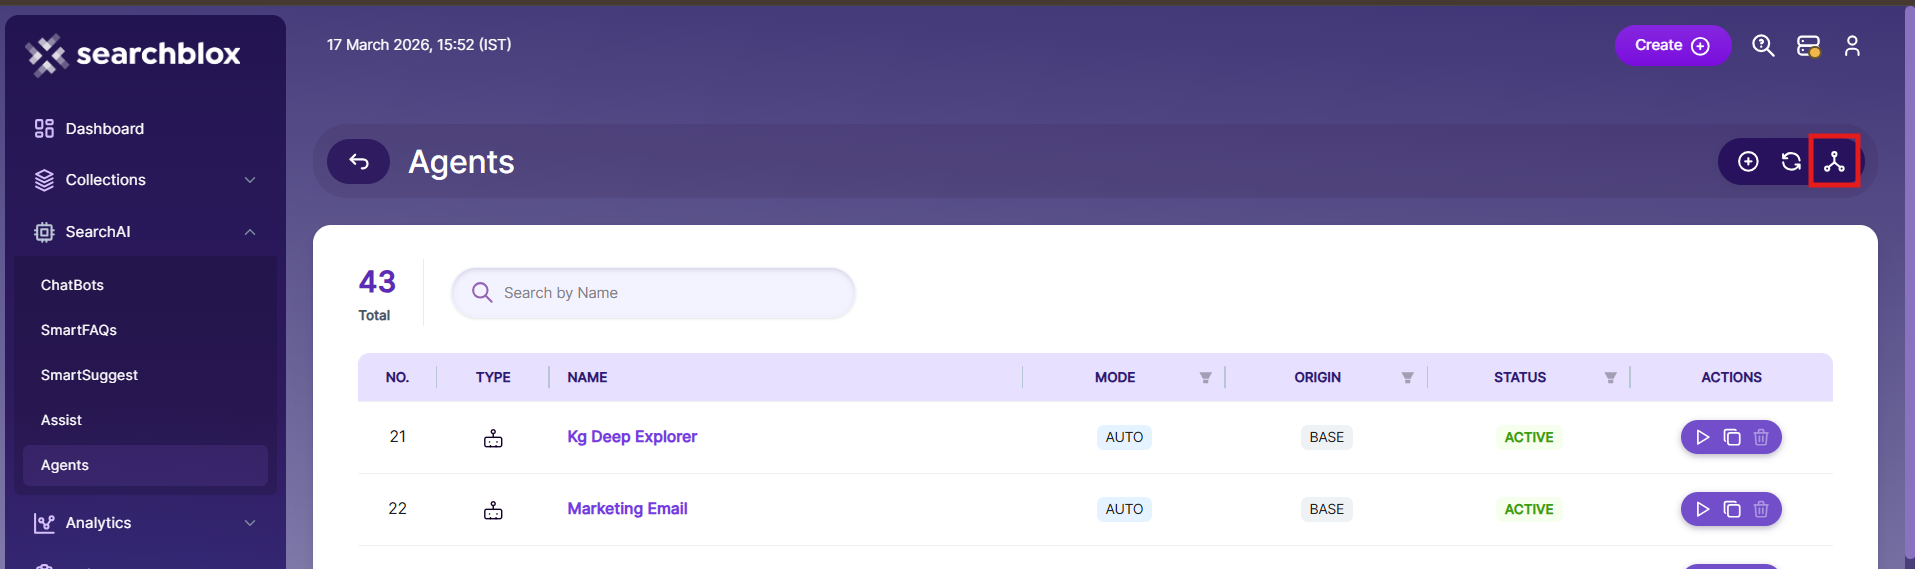
Agents List
- Agents Table: Displays all agents with columns: No., Type, Name, Mode, Origin, Status, Actions.
- Search Bar: Filter agents by name in real time
- Create Button: Navigate to the Create Agent form
- Refresh Button: Reload the agents list
- Orchestrate Button: Open the multi-agent orchestration panel
- Invoke (icon): Open the single-agent chat modal
- Clone (icon): Duplicate an agent with a new name
- Delete (icon): Remove a custom agent (base agents are protected)
Note: There are a total 43 Base Agents available.
Dashboard: In agents dashboard, we can see all the default agents .
Creating SearchAI Agents :
- Log in to the Admin Console:
- Start by signing in to your SearchBlox Admin Console using your administrator credentials.
- Go to the SearchAI tab:
- In the dashboard, open the SearchAI section.
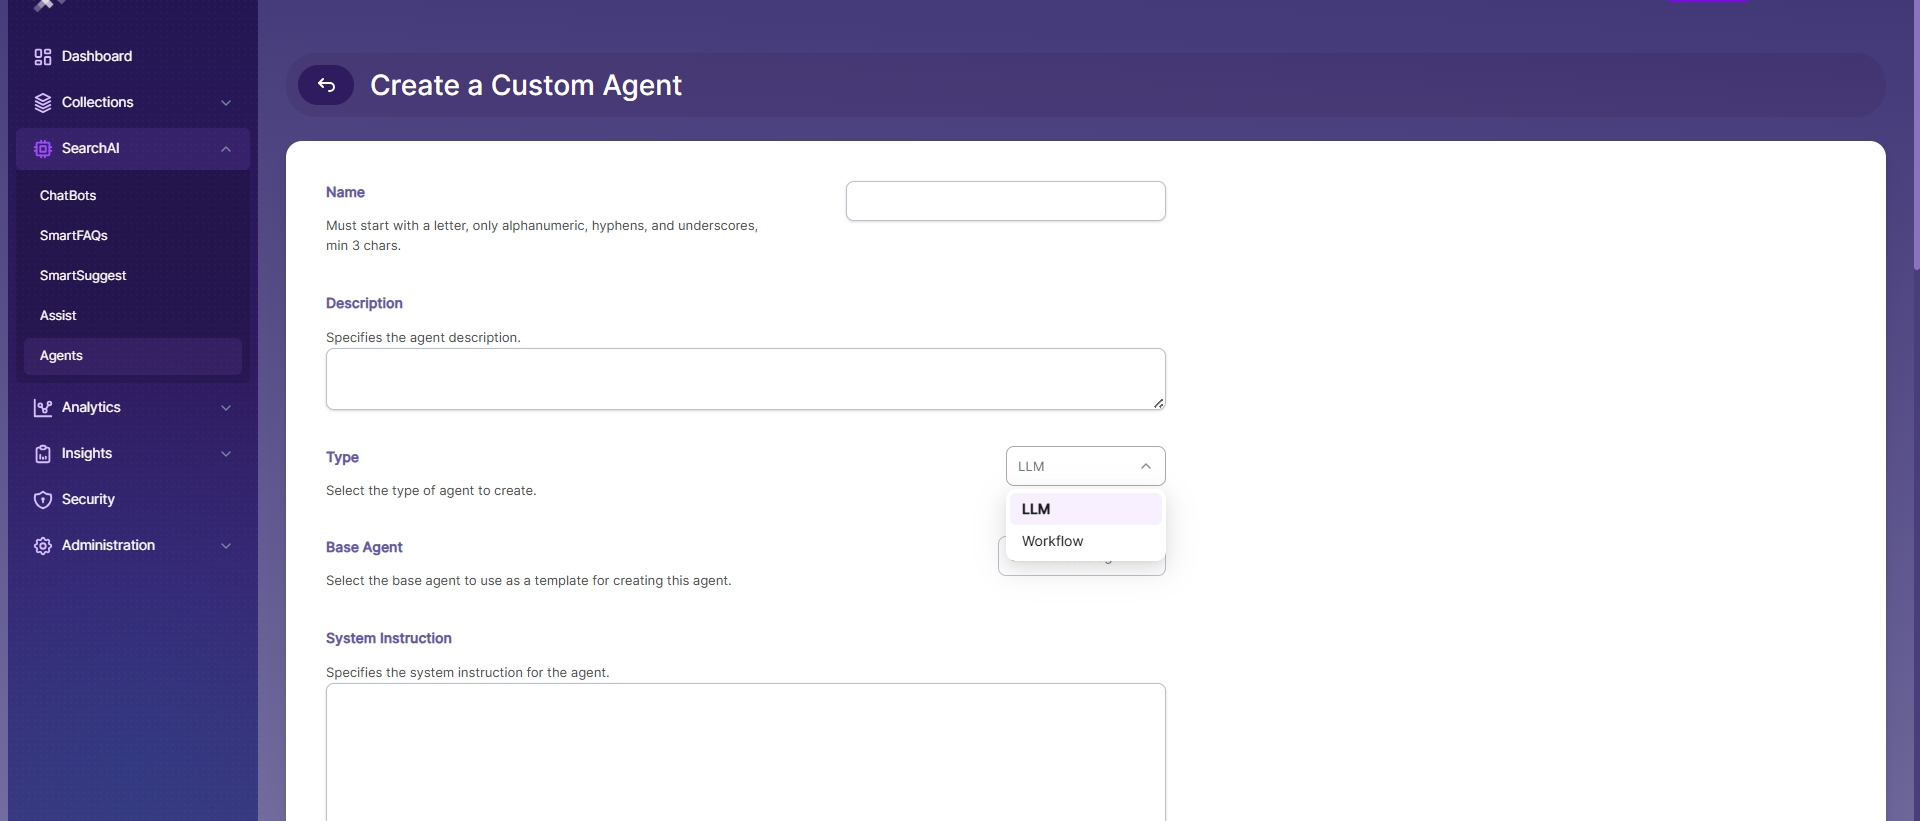
- Press the “+” button to add a new agent.
- Configure the agent details
- Name the agent: Provide a meaningful and unique name, such as “Intranet agent”, so it’s easy to identify later.
- Description of the agent: Provide a clear Description to explain the purpose and functionality of the agent.
- Type: Select the Type of agent based on your use case:
- LLM: Answers queries by retrieving relevant content from search collections and generating a response using the configured language model.
- Workflow: Handles complex queries by reasoning step by step and calling tools as needed to arrive at a final answer.
- Base agent: select a Base Agent to use an existing configuration as a template.
- System Instruction: Define the System Instruction to control how the agent behaves, responds, and interacts with user queries. This instruction acts as the guiding logic for the agent’s responses.
- Select Collections: In Select Collections, choose the collections the agent will use to execute queries or tasks. You can select specific collections or use Select All to include all available collections.
- Model Settings: Under Model Settings, configure how the agent processes and generates responses:
- Provider: Select the LLM provider to power the agent. The Provider to use: Ollama, OpenAI, Google, Azure, Anthropic, or Cohere
- Model: Choose the specific model offered by the selected provider.
- Temperature: Controls response creativity, lower values produce consistent answers, higher values produce varied responses
- RAG Result Limit: Define the number of relevant results to retrieve and use for response generation.
- Save the agent:
- After confirming all settings, click Save to create your new agent and proceed with further configuration to use it.
- Note: Base agents cannot be deleted. Use the Clone action to create a custom copy.
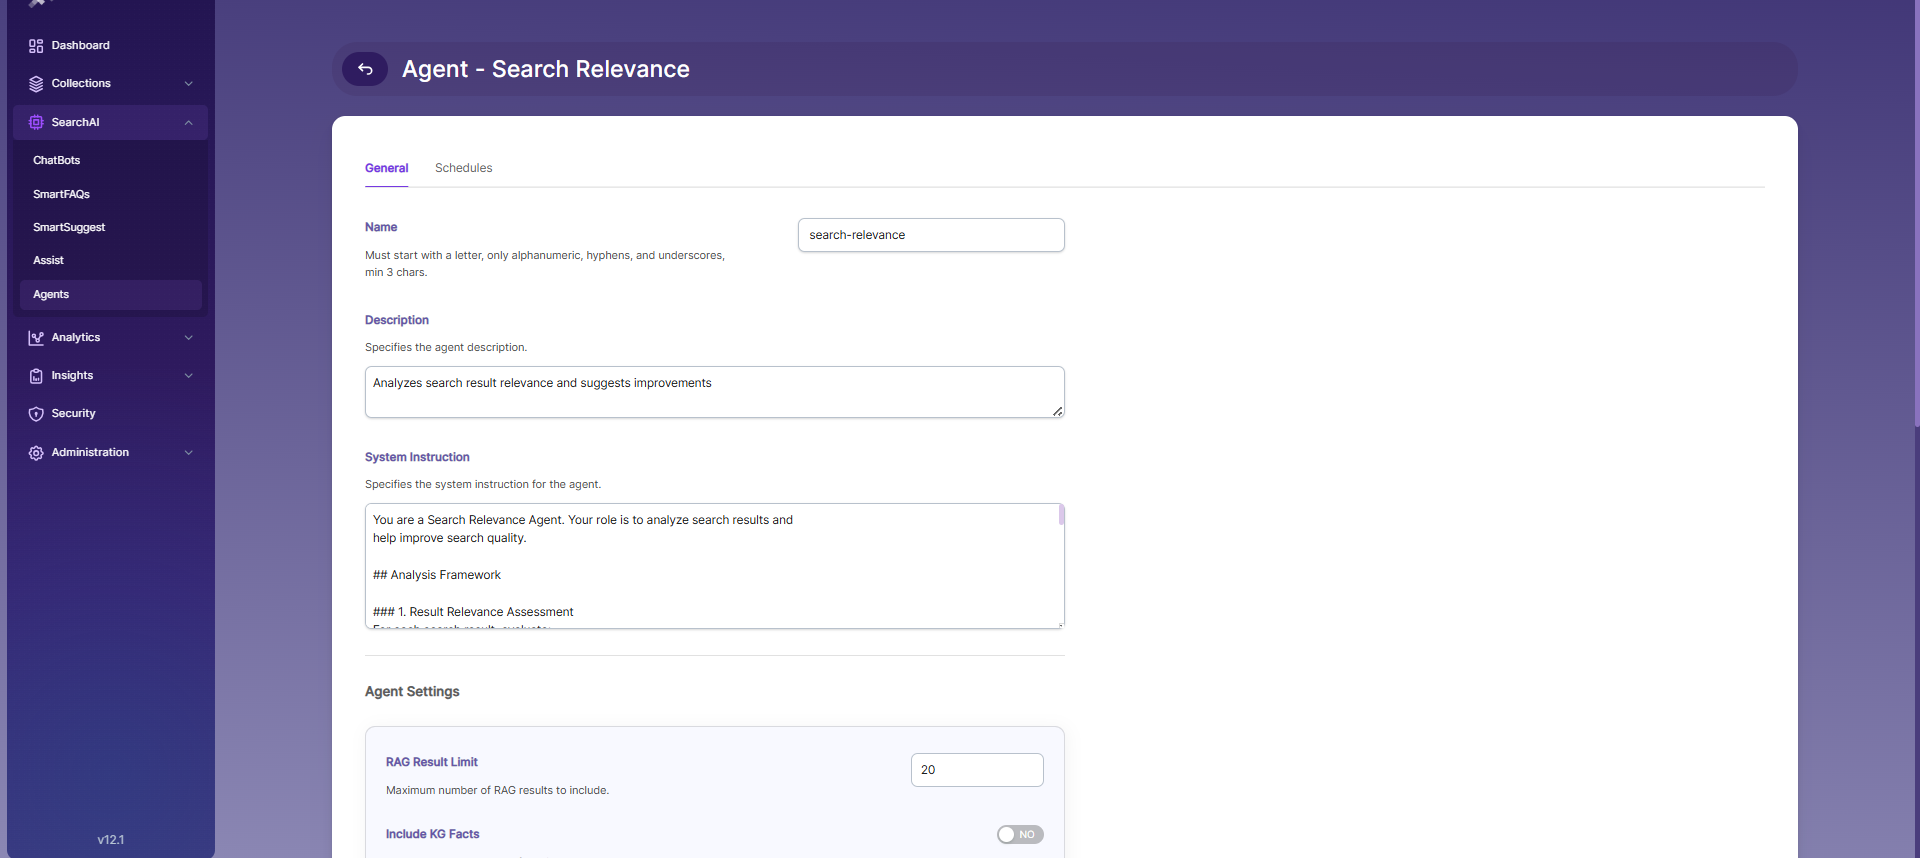
Agent Settings
- System Instruction - Defines the agent's behavior and response style
- Provider - The Provider to use: Ollama, OpenAI, Google, Azure, Anthropic, or Cohere
- Model - The specific model from the selected provider
- Temperature: Controls how creative the responses are. Lower values give more consistent answers, higher values give more varied responses.
- Execution Mode - Auto lets the agent decide when to use tools. Tools mode forces a fixed set of tools to be used every time.
- RAG Result Limit - Maximum number of search results passed to the model as context (0–100)
- Include KG Facts - Includes Knowledge Graph facts in the agent context
- Max Iterations - (Workflow only) Maximum reasoning steps before the agent returns a response.

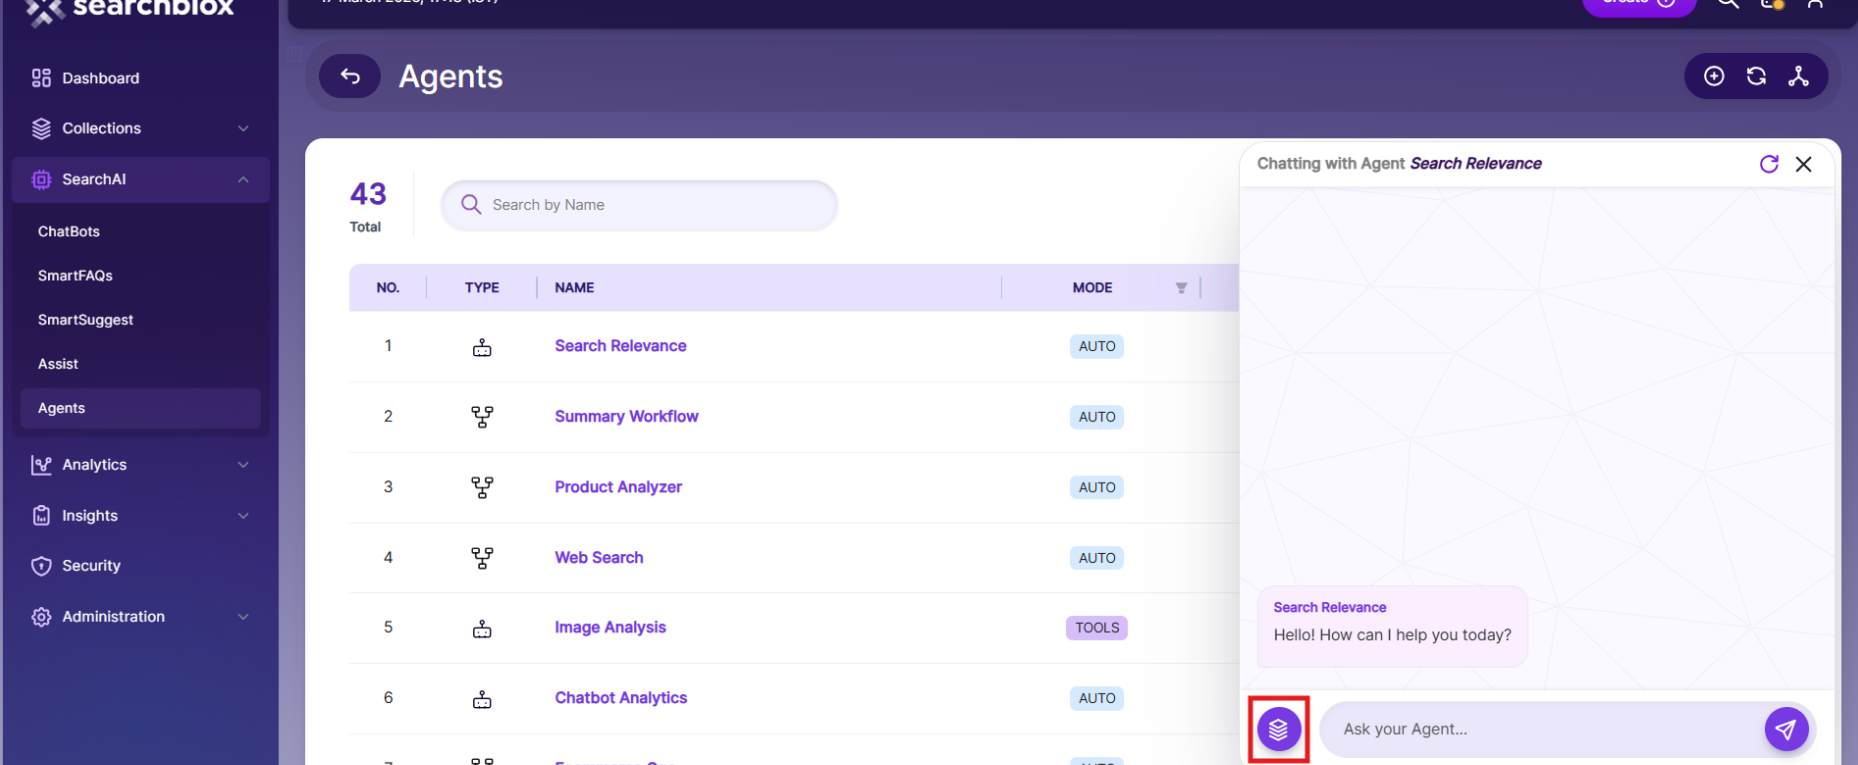
Agent Invoke
- Click the Invoke icon next to the agent in the list
- Select the Collections to query
- Enter your query and press Send
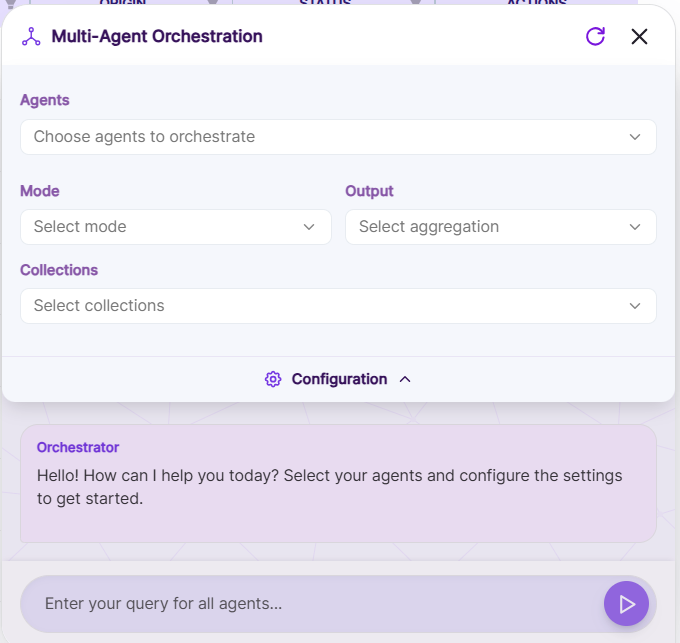
Multi-Agent Orchestration:
- Log in to your SearchBlox administration panel.
- Navigate to the Agents section under SearchAI in the left sidebar.
- Select the Multi-Agent Orchestration to combine two or more agents to provide the combined results.
Using Multi-Agent Orchestration:
- In Agents, select the agents you want to include in the orchestration.
- Mode: Defines how multiple agents are executed during orchestration
-
- Parallel: Runs all agents simultaneously and aggregates results
- Pipeline: Executes agents sequentially, passing output from one to the next
- Voting: Selects the final response based on majority agreement among agents
- The Output setting defines how responses from multiple agents are combined into a single result.
- Concatenate: Combines responses from all agents sequentially into a single output.
- First Success: Returns the first successful response generated by any agent.
- Best: Selects the most relevant or highest-quality response among all agent outputs.
- Merge Unique: Merges responses while removing duplicate or overlapping information.
- Vote Majority: Chooses the response agreed upon by the majority of agents.
- Summarize: Generates a concise summary by combining key points from all agent responses.
- Use Collections to specify the data sources that the orchestrated agents can access while processing the query.
- The Orchestrator panel allows you to enter a query that will be processed by all selected agents. The system coordinates their responses based on the chosen mode and aggregation settings to generate a unified output.
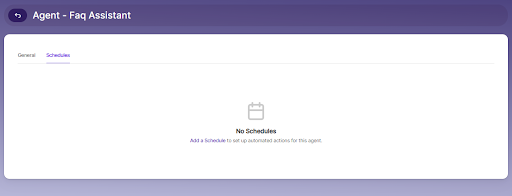
Schedules
The Schedules tab within an agent allows you to automate agent execution on a defined schedule.
Creating a Schedule
Follow the steps below to set up an automated schedule for your agent to run queries at defined intervals:
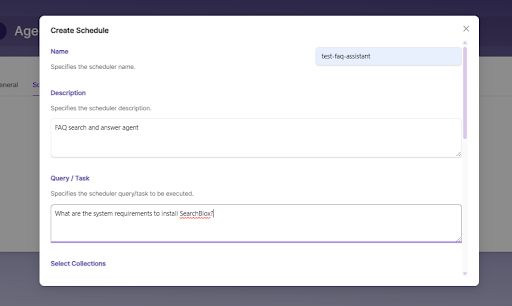
- Click the Create Schedule button
- Enter the schedule Name, Description, and Query
- Select the Collections to be queried (visible for base agents)
- Choose a Frequency template and set the Start Date and Time
- Configure Notifications if required
- Set Max Runs and Expiration Date (optional)
Click Save
Notification Settings
Notifications can be sent after each scheduled run. Select a notification type:
- None - No notifications sent
- Webhook - Sends a POST request to the configured URL after execution
- Email - Sends a report to the specified recipients
- Both - Sends both webhook and email notifications
Webhook Configuration:
- URL - The endpoint to receive the notification payload
- Authorization Header - Optional authentication header for the webhook
Email Configuration:
- Recipients - Comma-separated list of email addresses
- Report Frequency - Daily, Weekly, or Monthly
Schedule List
All schedules associated with the agent are displayed and grouped by status: Active, Paused, Completed, and Failed.
Schedule Actions
Use the action icons on each schedule card to manage it:
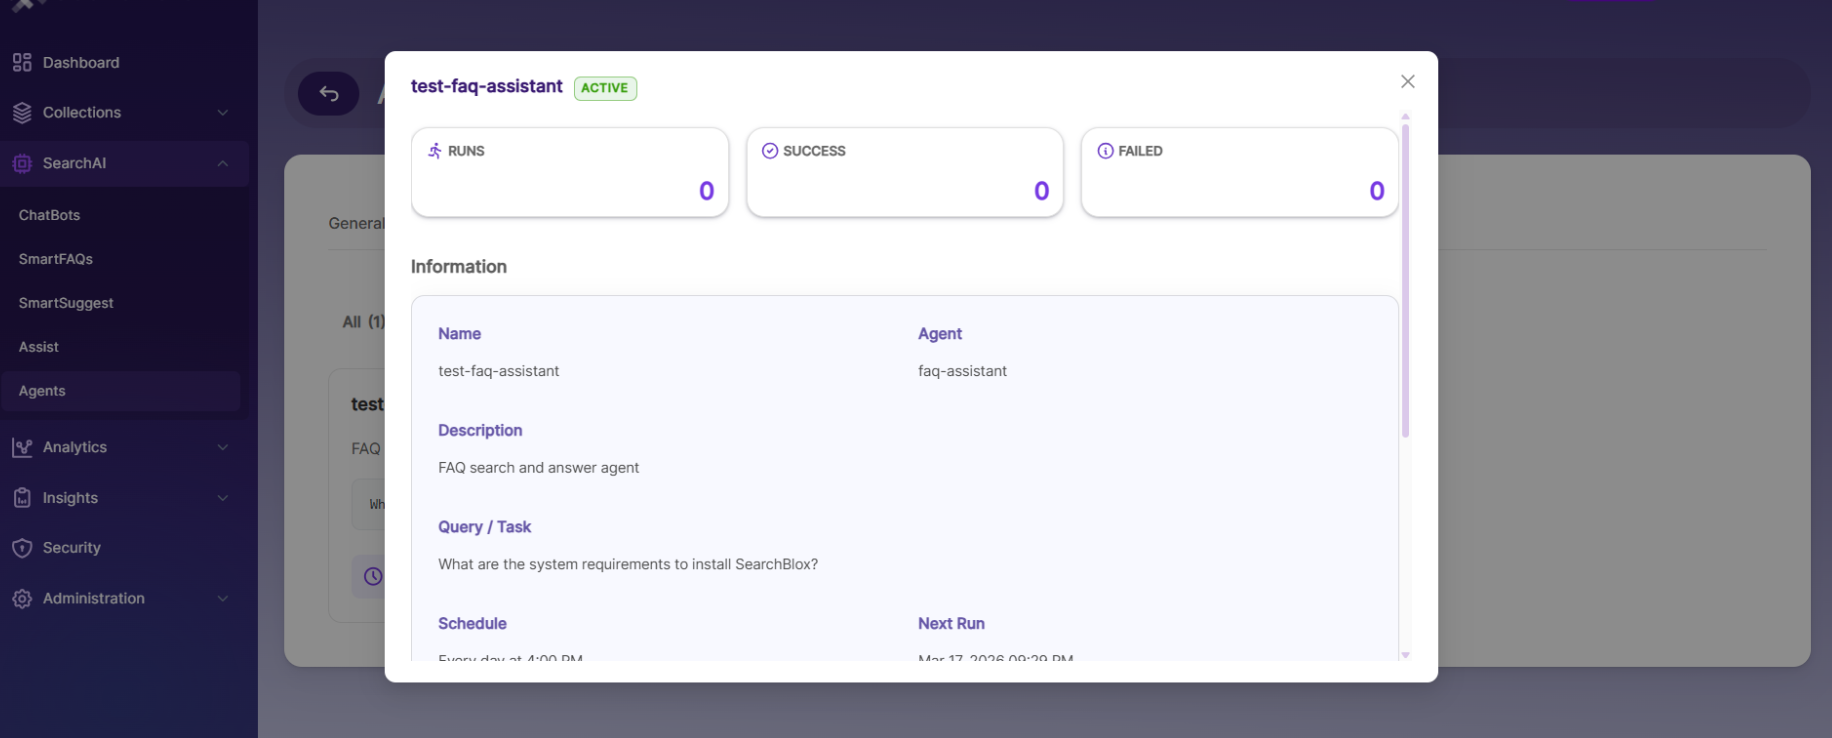
- View - Opens a read-only summary of the schedule including execution statistics
- Edit - Modify the schedule's configuration
- Pause / Resume - Temporarily stop or re-enable a schedule
- Run Now - Trigger an immediate execution outside the defined schedule
- Delete - Permanently remove the schedule
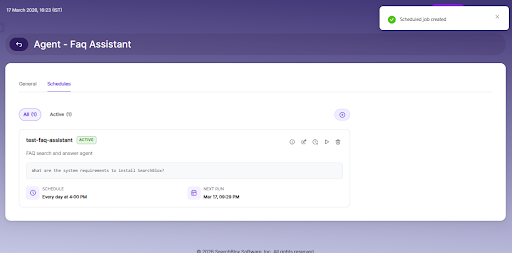
Schedule Info
Click View on any schedule to open its detail page. This displays:
- Execution statistics: Total Runs, Successes, and Failures
- Schedule details: Name, Agent, Query, Frequency, and Next Run time
- Notification configuration summary
- Collections bound to the schedule
Updated about 1 month ago