
JIRA DB Connector
Set-Up Instructions
Task 1 – Create a Database Collection in SearchBlox
After logging in to the Admin Console, go to the Collections tab and click Create New Collection or the “+” icon.

Next, select Database Collection as the collection type.

Enter a unique name, choose the access type, select the language, and click Save to create the collection. This will add the database collection to the SearchBlox server.
Task 2 – Database Collection Settings
Select JIRA as the database type from the dropdown list.
Enter the database URL in the format shown below:
jdbc:jira:[email protected];Password=password;Url=https://yoursite.atlassian.net;API Token=XXX;
Provide an SQL query to fetch data from JIRA. The query format is:
SELECT as uid , as title, as content FROM LIMIT 100
Configure SQL Query
Some of the commonly used tables and queries in JIRA are:
SELECT * FROM Projects
SELECT * FROM Comments
SELECT * FROM Issues
For more data tables that can be indexed from JIRA, use the following link:
https://cdn.cdata.com/help/BJG/jdbc/pg_overview.htm
If you have more than 100 entries in a table, specify the number of documents to be indexed by giving LIMIT value in the query. For example:
SELECT * FROM Account LIMIT 1000
Otherwise, a minimum of 50 rows will be indexed.
To generate an API token, log in to your JIRA account.
Go to Account Settings → Security → Create and Manage API Tokens → Create API Token.
.png")
Save the Settings
Click Save to store your configuration.
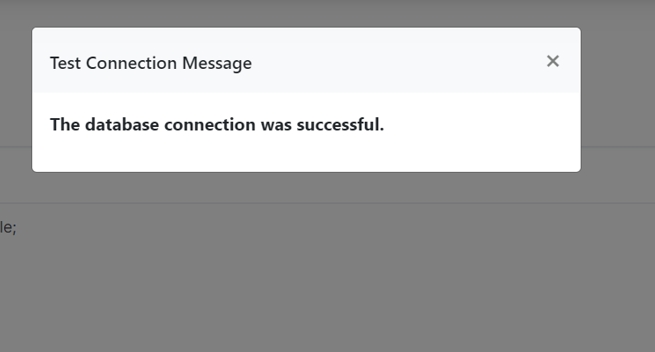
Test the Connection
Click Test Database Collection to verify the settings.
The database connection must be successful for indexing to work properly.
Task 3 – Schedule and Index
Schedule indexing either from the Schedule tab or from the Manage Collection page.

After the maximum number of documents is reached, click Stop if you do not need continuous indexing.
The search results in faceted search are displayed as shown here:


Task 4 – Viewing Search Result in Kibana
Indexed content from JIRA can be viewed using Kibana.
The following example uses the maximum number of fields available in the account data table. Use this query:
SELECT * FROM Issues LIMIT 1000
Steps in Kibana
1. Start Kibana
How to start Kibana Visualizations
2. Add the collection ID

**3. After adding the index, you can see the mapped fields.

**4. Create visualizations by following the steps in the reference link provided in the previous step.
Example of a sample visualization generated from JIRA data:

Updated 4 months ago