Salesforce Data Source
Configuring SearchBlox
Before using Salesforce Data Source, install SearchBlox successfully and create a Custom Collection.

Configuring Salesforce Application
- To authenticate using OAuth, you must create a connected app that defines your application’s OAuth settings for the Salesforce organization.
Please refer the link Defining Connected App - Make sure you set IP Relaxation setting to “ Relax IP Restrictions“ - as shown in screenshot

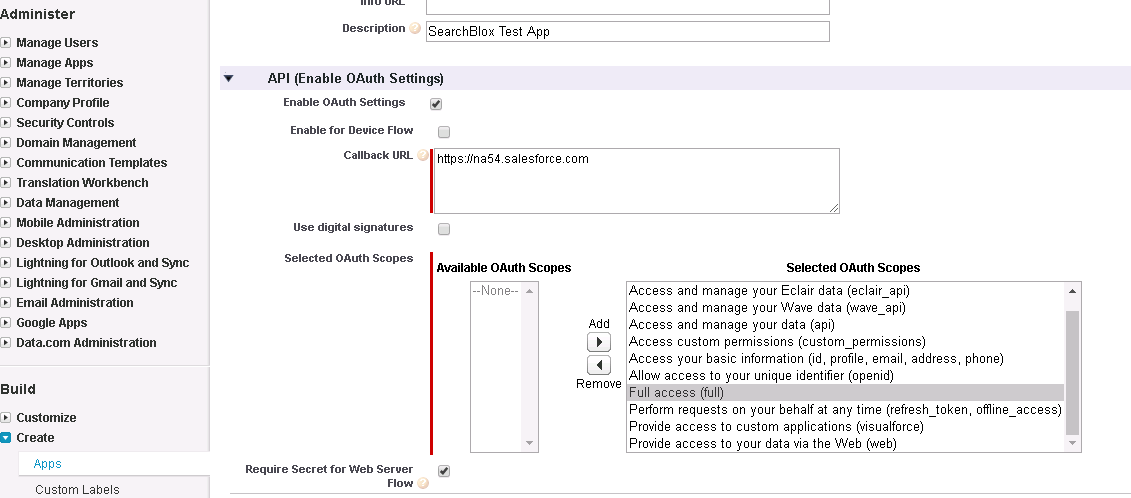
- Please Enable OAuth Settings and under Enable OAuth settings, make sure you select "Full Access" for selected OAuth scopes as shown in the following:

- Please make sure that you can view /change salesforce version under setup>Build>Develop>Apex classes>New>Version Settings.

Configuring Salesforce Data Source
- Download the SearchBlox Connector UI. Extract the downloaded zip to a folder.
Contact [email protected] to request the download link for SearchBlox Connectors UI. The following steps include the example paths for both Windows as well as Linux. In Windows, the connector would be installed in the C drive.
- Unzip the archive under C:* or /opt*.
- Create a data folder on your drive where the files would be temporarily stored.
- Configure the following properties once you create a data source in the connector UI.
Note:
In Linux, make sure that necessary permissions have been provided to the folder /opt by using the CHMOD command for writing log files and executing jar files.
| username | User Name in Salesforce |
| password | Password in Salesforce |
| data-directory | Data Folder where the data needs to be stored. Make sure it has write permission. |
| api-key | SearchBlox API Key |
| colname | The name of the custom collection in SearchBlox. |
| url | SearchBlox URL |
| version | Salesforce API version to be used |
| clientId | Salesforce Client ID |
| clientSecret | Salesforce Client Secret |
Updated over 4 years ago
