
Installing on Ubuntu
Prerequisites
-
Install OpenJDK 11 by running the following command:
sudo add-apt-repository ppa:openjdk-r/ppa && sudo apt-get update -q && sudo apt install -y openjdk-11-jdk -
Verify the java installation by running the following command:
java -version -
Install wget using the following command:
sudo apt-get update
sudo apt-get install wget -
Set the map count within the file /etc/sysctl.conf by adding the following line:
vm.max_map_count=262144 -
Increase ulimit value and validate system settings
-
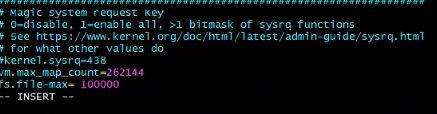
To change the file descriptor setting, edit the file /etc/sysctl.conf.
Add linefs.file-max= 100000to it.
-
To apply the changes :
sysctl -p -
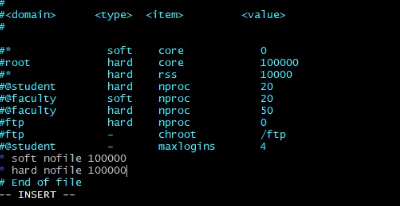
To change the ulimit setting, edit the file /etc/security/limits.conf and set the hard and soft limits:
* soft nofile 100000
* hard nofile 100000
-
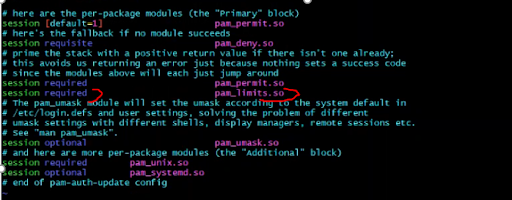
After that enable the pam_limits as followings:
Edit the file /etc/pam.d/common-session and add the following line:
session required pam_limits.so
-
Reboot the server for the changes to take effect:
reboot -
Check the ulimit settings by running the following commands:
ulimit -a
ulimit -Sn# Check soft limit
ulimit -Hn# Check hard limit
SearchBlox Installation
-
Please login as root using sudo su if you are not the root user or install using sudo as below.
-
Create a SearchBlox user by giving the necessary details
sudo adduser searchblox -
SearchBlox has to be installed in /opt folder, so change directory to /opt
cd /opt -
Download SearchBlox debain package
sudo wget https://d2fco3ozzrfhhd.cloudfront.net/v10.2/searchblox_10.2-0_all.deb -
Install the debian package
sudo dpkg -i searchblox_10.2-0_all.deb -
Change permission for few folders by running the following commands:
sudo chown -R searchblox:searchblox /opt/searchblox
sudo chmod -R 755 /opt/searchblox/bin
sudo chmod -R 755 /opt/searchblox/elasticsearch/bin
sudo chmod -R 755 /opt/searchblox/analytics
sudo chmod -R 755 /opt/searchblox/logs
sudo chmod -R 755 /opt/searchblox/elasticsearch/logs
sudo chmod -R 755 /opt/searchblox/connectors -
To start SearchBlox service:
systemctl start searchblox -
To stop SearchBlox service:
systemctl stop searchblox -
To verify the status of the SearchBlox service:
systemctl status searchblox
Verify Installation
Once you start the SearchBlox service, wait for 30 - 60 seconds then go to https://localhost:8443/console to validate.
- You can also verify if SearchBlox has started successfully by viewing the status.log file in the
/opt/searchblox/webapps/ROOT/logsfolder.
Please confirm the message "SearchBlox Started" is shown in the log. In case of any errors, this log will provide additional information for troubleshooting.
-
To learn more on Troubleshooting visit: Logging and Troubleshooting
-
To learn about accessing SearchBlox visit: Overview of SearchBlox
-
To learn about tuning after installation visit: Installation Tuning
SearchBlox Admin Console Access using IP Address or Domain Name- You can use your IP instead of localhost in the URL to access the SearchBlox Admin Console.
- If a domain name is mapped to the IP address, you can use the domain name:
https://exampledomain:port/console
https://exampledomain:port/search/index.html
Change SearchBlox Server Port
SearchBlox Server runs on port 8443 by default.
- For secure ports refer Secure Ports used by SearchBlox section on Requirements.
You can change the port by following the steps below:
-
Stop SearchBlox service
-
Edit the file /opt/searchblox/start.d/https.ini and add the below line to set the required port number:
jetty.ssl.port=443 -
Save the file https.ini
-
Start SearchBlox service
Uninstall
-
First Stop the SearchBlox, by running the command:
systemctl stop searchblox -
Run the following command to uninstall or remove SearchBlox:
apt-get remove searchblox -
To remove the user, run the command;
userdel searchblox -
Reboot the server:
reboot
Note: For clean SearchBlox uninstallation, it is required to remove searchblox directory i.e., /opt/searchblox manually by running the following command:
rm -rf /opt/searchblox
Disk Encryption
Additional Disk is required for disk encryption
-
Installation of cryptsetup for Ubuntu:
sudo apt-get install cryptsetup -
LUKS Format disk
Note: while formatting the disk we have to give some password
cryptsetup luksFormat /dev/sdbWARNING! ======== This will overwrite data on /dev/sdb irrevocably. Are you sure? (Type uppercase yes): YES Enter LUKS passphrase: Verify passphrase: -
Luks open
Note: We have to use the password created earlier while formatting the disk.
cryptsetup luksOpen /dev/sda dataEnter passphrase for /dev/sdb: -
Create a filesystem
mkfs -t ext4 /dev/mapper/datamke2fs 1.42.13 (17-May-2015) Creating filesystem with 52428288 4k blocks and 13107200 inodes Filesystem UUID: 1c71b0f4-f95d-46d6-93e0-cbd19cb95edb Superblock backups stored on blocks: 32768, 98304, 163840, 229376, 294912, 819200, 884736, 1605632, 2654208, 4096000, 7962624, 11239424, 20480000, 23887872 Allocating group tables: done Writing inode tables: done Creating journal (32768 blocks): done Writing superblocks and filesystem accounting information: done -
Mounting the new file system at /opt
mount /dev/mapper/data /opt -
To get UUID
blkid /dev/mapper/data/dev/mapper/data: UUID="0a228c13-06d8-4739-99c3-f596c2dcce8e" TYPE="ext4" -
We need to add the UUID into /etc/fstab like this and save it
Note: We need to add the UUID into etc/fstab fileLABEL=cloudimg-rootfs / ext4 defaults,discard 0 0 UID="4539b70d-66ab-4c07-b2a2-d4583f461a2f" /secret ext4 defaults 0 0 UID="4539b70d-66ab-4c07-b2a2-d4583f461a2f" /opt ext4 defaults 0 0 UUID="0a228c13-06d8-4739-99c3-f596c2dcce8e" /opt ext4 defaults 0 0 ===================================================
- To close encryption
cryptsetup luksClose /dev/mapper/data - To open encryption
cryptsetup luksOpen /dev/mapper/data
Updated 19 days ago